Почему толщина радиатора нарушает совместимость сборок с остальным оборудованием?
Ложь о совместимости, напечатанная в слишком многих технических характеристиках.
Подходящая форма – это подделка.
На корпусе для ПК может быть честно указано «поддержка радиатора 360 мм», но при этом он всё равно не подойдёт для вашей реальной сборки, потому что на этой маркировке обычно указывается длина и схема крепления, а не суммарная глубина, включающая толщину радиатора, толщину вентилятора, радиаторы материнской платы, высоту оперативной памяти, радиус изгиба кабелей EPS, фитинги трубок, головки винтов и те самые мелкие допуски, которые отличают аккуратную сборку от двухчасовой разборки.
Так почему же мы продолжаем воспринимать одно число как доказательство?
Я видел эту ошибку достаточно часто, чтобы назвать её привычкой в индустрии, а не ошибкой пользователя. Сборщик видит надпись «поддержка верхнего 360-мм вентилятора», покупает 38-мм или 45-мм радиатор, добавляет стандартные 25-мм вентиляторы, устанавливает всё это в корпус ATX и обнаруживает, что верхняя рама вентилятора теперь «конфликтует» с памятью DDR5 RGB или радиатором VRM материнской платы. Компоненты были «совместимы». Сборка — нет.
Такова неприятная правда о толщине радиатора: она не просто делает радиатор толще. Она меняет геометрию всей машины.
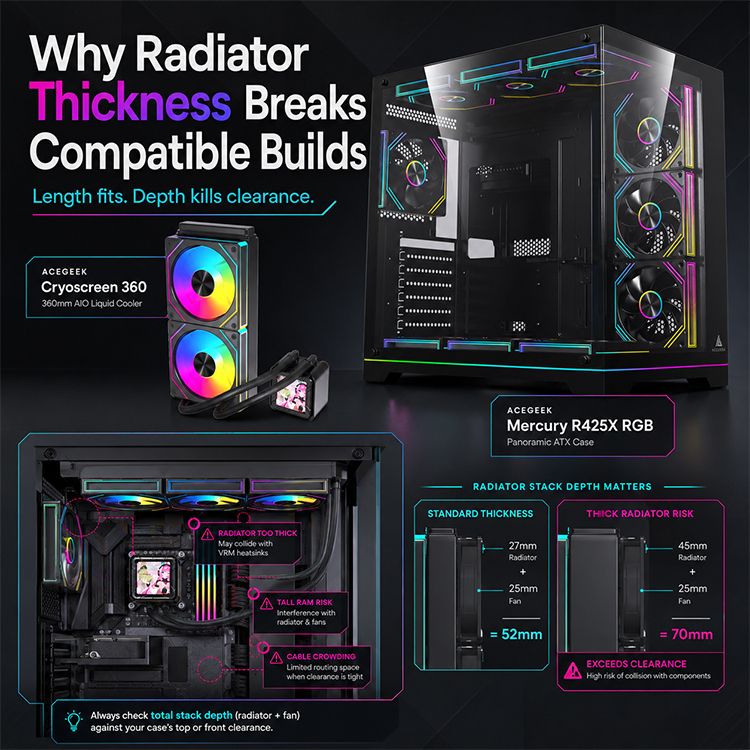
Тонкий 27-миллиметровый радиатор с 25-миллиметровыми вентиляторами образует 52-миллиметровый блок без учета головок винтов, резиновых прокладок, натяжения кабелей и свободного пространства для вентиляции. 45-миллиметровый радиатор с теми же вентиляторами становится 70-миллиметровым без учета этих дополнительных элементов. Добавьте вентиляторы с двухтактной системой охлаждения, и тот же радиатор может стать 95-миллиметровым. Это немаленькая разница. Это разница между «установленным» и «почему мой кабель EPS зажат под лопастью вентилятора?»
Если вы все еще выбираете корпус, начните с руководства по выбору корпусов для ПК от AceGeek, а затем сверьтесь с руководством по совместимости радиаторов с корпусами от этого же производителя. Длина — это только первая дверца. Толщина — это коридор, через который вы, возможно, не сможете пройти.
Толщина радиатора — это системная проблема, а не проблема самого радиатора.
Толщина радиатора звучит как параметр, определяющий эффективность охлаждения. На самом деле это параметр, определяющий зазоры.
Более толстый радиатор обычно имеет больше металла, больший объем охлаждающей жидкости и потенциально большую теплоотдачу. Но этот потенциал имеет значение только тогда, когда вентиляторы могут прокачивать достаточно воздуха через радиаторную решетку, а корпус обеспечивает этому воздуху доступ. Если радиатор прижат к кожуху материнской платы, испытывает недостаток тепла за стеклянной панелью или работает в паре со слабыми вентиляторами на низких оборотах, дополнительная толщина превращается в дорогостоящий лишний вес.
Но чем толще слой, тем безопаснее.
В этом и заключается ловушка. В системах охлаждения ПК «больше» часто скрывает компромисс. Большая глубина радиатора может означать большее сопротивление воздуха. Большее давление, требуемое вентиляторами. Больше сложностей с прокладкой трубок. Больше конфликтов с высокой оперативной памятью. Больше заблокированных разъемов. Больше шума, когда вентиляторы работают на более высоких оборотах, чтобы преодолеть сопротивление.
Крупные операторы это знают. В рекомендациях ENERGY STAR по организации воздушного потока в центрах обработки данных говорится, что холодный приточный воздух должен поступать к воздухозаборникам оборудования, а горячий обратный воздух должен направляться обратно без помех; даже простое разделение воздушных потоков может повысить эффективность охлаждения, а 12-дюймовая заглушка может снизить температуру в стойке на 20°F в приведенном примере. Настольный ПК меньше, менее громоздкий и дешевле, но законы физики здесь не отличаются: воздушный поток, который не может достичь теплообменника, является потерянным воздушным потоком.
Теперь перенесём это на ваш случай. Если ваш верхний радиатор слишком толстый, вентиляторы могут располагаться слишком близко к радиаторам оперативной памяти, радиатор может блокировать доступ к кабелям, и поток горячего воздуха может быть нарушен. Кулер больше. Система хуже.
Суровая правда: тонкий радиатор с чистым воздушным потоком часто оказывается лучше толстого радиатора, установленного наобум.
В руководстве AceGeek по сборке ПК с улучшенной системой охлаждения этот аспект рассматривается правильно, поскольку обеспечение циркуляции воздуха — это вопрос денег, а не вопрос декора. В первую очередь тратьте деньги на то, что обеспечивает циркуляцию воздуха. Затем тратьте на более мощные компоненты системы охлаждения только тогда, когда корпус действительно может их использовать.
Математические конструкторы стека игнорируют это до полуночи
Вот формула расчета зазора между радиатором и радиатором, которой я действительно доверяю:
Глубина радиаторной сборки = толщина радиатора + толщина вентилятора + зазор под головку винта + зазор под виброгасящую прокладку + пространство для труб/фитингов + пространство для изгиба кабеля + запас для обслуживания
Последний пункт имеет значение. Запас пространства для обслуживания — это не роскошь. Это пространство, которое позволяет извлечь оперативную память, подключить кабель EPS, добраться до разъема вентилятора, переподключить кабель помпы или очистить от пыли, не разбирая половину системы.
Типичная моноблочная система:
Настройка системы охлажденияТолщина радиатораТолщина вентилятораПриблизительная высота установки до дополнительных компонентовРеальный рискТонкий СЖО 240/280/360 мм27 мм25 мм52 ммОбычно подходит для корпусов среднего размераСтандартный радиатор для кастомной системы охлаждения30 мм25 мм55 ммХороший баланс, если смещение корпуса выбрано правильноРадиатор средней толщины38 мм25 мм63 ммВозможны конфликты с верхней установкой ОЗУ и VRMТолстый радиатор45 мм25 мм70 ммТребует тщательного подбора корпуса, материнской платы и ОЗУТолстый радиатор + система push-pull45 мм50 мм всего95 ммОбычно подходит для больших корпусов, а не для стандартного ATXЭкстремальный 60-мм радиатор60 мм25 мм85 ммЧасто требует мощных вентиляторов, большого пространства в корпусе или системы push-pull
Нет, утверждение «корпус поддерживает 360 мм» не даёт ответа ни на один из этих вопросов.
Радиатор размером 360 мм обозначает расстояние между вентиляторами: три места для 120-мм вентиляторов. Это не говорит о том, проходит ли радиатор над верхним краем материнской платы. Это не говорит о том, могут ли трубки изгибаться, не упираясь в стекло. Это не говорит о том, превратит ли ваша 44-миллиметровая оперативная память с RGB-подсветкой верхнюю часть радиатора в зону риска столкновения.
Вот почему руководство по совместимости комплектующих для ПК от AceGeek должно быть частью того же процесса, что и любая покупка радиатора. Совместимость — это не одна зеленая галочка. Это последовательность физических вопросов.
Цифры, которые должны заставить строителей быть менее небрежными.
Современные компоненты не отличаются бережным отношением к деталям.
На официальной странице Intel процессора Core i9-14900K указаны 24 ядра, 32 потока, максимальная частота в режиме Turbo Boost 6,0 ГГц, базовая потребляемая мощность процессора 125 Вт и максимальная мощность в режиме Turbo Boost 253 Вт. Это серьёзная тепловая нагрузка для настольного процессора, особенно при рендеринге, компиляции, моделировании и выполнении ресурсоёмких задач с использованием всех ядер.
На странице NVIDIA RTX 4090 Founders Edition указаны следующие характеристики: общая мощность видеокарты 450 Вт, средняя мощность для игр 315 Вт, требуемая мощность системы 850 Вт, длина 304 мм, ширина 137 мм, толщина 61 мм (в 3 слота) и дополнительный зазор для кабелей 36 мм. Это нагреватель с разъемом PCIe.
Поэтому, когда кто-то говорит, что толщина радиатора составляет «всего несколько миллиметров», я слышу дилетантское замечание.
Высокопроизводительный процессор в сочетании с мощным графическим процессором могут выделять сотни ватт тепла в корпус. Согласно анализу Международного энергетического агентства (МЭА) на 2025 год, охлаждение и контроль микроклимата могут составлять около 7% потребления электроэнергии в эффективных гипермасштабных центрах обработки данных и более 30% в менее эффективных корпоративных центрах обработки данных, в то время как глобальное потребление электроэнергии центрами обработки данных в 2024 году оценивалось примерно в 415 ТВт·ч. Суть не в том, что ваш игровой ПК — это центр обработки данных. Суть в том, что отвод тепла никогда не бывает бесплатным.
Сборщики ПК обожают эффектные комплектующие: 6 ГГц, 24 ГБ GDDR6X, видеокарта мощностью 450 Вт, 360-мм система жидкостного охлажения, двухкамерный корпус, 10 вентиляторов. Но успех или неудача сборки зависят от скучной геометрии.
Толстый против тонкого радиатора: спор, который никто честно не поднимает.
Обычно в интернете спорят на скорую руку: толстый радиатор против тонкого радиатора.
Неправильная рамка.
Более уместный вопрос: какая толщина радиатора подходит для вашей скорости вращения вентиляторов, воздушного потока в корпусе, положения крепления, высоты оперативной памяти, компоновки материнской платы и желаемого уровня шума?
Толстый радиатор может оказаться лучшим вариантом, если он обеспечивает достаточный поток воздуха и достаточный зазор. Тонкий радиатор может оказаться лучшим вариантом, если он обеспечивает более чистый приток воздуха, меньшее сопротивление, более тихую работу вентилятора и меньше компромиссов в установке. Победитель — не деталь, а вся система.
Я бы разложил это по полочкам следующим образом:
Факторы, влияющие на решение: Преимущества тонкого радиатора; Преимущества толстого радиатора. Моё прямое мнение: Зазор для верхней установки; Упрощённый зазор для оперативной памяти, VRM и EPS; Более высокий риск столкновения; Тонкий радиатор безопаснее для верхней установки; Шум на низких оборотах; Часто обеспечивает более тихую работу; Может потребоваться большее давление вентилятора; Толстый радиатор не обязательно тихий; Пространство для фронтальной установки; Оставляет больше места для видеокарты/кабелей; Может уменьшить внутренний зазор; Измерьте длину видеокарты после радиаторного блока; Вентиляторы с двухтактным режимом работы; Менее вероятно, что они станут чрезмерно глубокими; Может хорошо работать при достаточном пространстве; Двухтактные вентиляторы подходят для плановых сборок, а не для экстренных; Маленькие корпуса; Лучшие шансы на выживание; Часто нереалистично; Сборщикам SFF следует опасаться толщины; Высокая мощность процессора; Может потребоваться большая площадь поверхности или более высокие обороты; Большая тепловая масса и глубина ребер могут помочь; Только если воздушный поток не ограничен; Доступ для обслуживания; Упрощённое обслуживание; Больше зажатых кабелей и заблокированных разъемов; Ваше будущее заслуживает места.
Я знаю, что любители толстых радиаторов не любят это слышать, но во многих сборках лучше использовать более крупный и тонкий радиатор, чем меньший и толстый. Большая площадь передней поверхности с чистым воздушным потоком часто оказывается лучше, чем дополнительная глубина, застрявшая в неудачном месте.
Вот почему зазор для радиатора и циркуляция воздуха в корпусе взаимосвязаны. Анализ охлаждения в зависимости от размера корпуса от AceGeek здесь полезен, поскольку небольшие корпуса не просто уменьшают объем; они сжимают всю цепочку решений. Угол трубок, выхлоп видеокарты, высота кожуха блока питания, смещение верхней части и ограничения передней панели — все это начинает конфликтовать друг с другом.
Где толщина радиатора нарушает совместимость сборок
Верхняя установка: наиболее распространенная ловушка
Радиаторы, устанавливаемые сверху, выходят из строя в узкой полосе над материнской платой. На рендерах это пространство выглядит пустым. В реальной машине оно содержит радиаторы оперативной памяти, радиаторы VRM, заднюю панель ввода/вывода, кабели питания EPS, разъемы для вентиляторов, кабели помпы, а иногда и терпение сборщика.
Верхний 360-мм СВО может физически прикручиваться к верхней панели, в то время как рама вентилятора будет упираться в память DDR5 RGB. 30-мм радиатор, возможно, не поместится. 45-мм радиатор может не поместиться. Добавьте защитные решетки для вентиляторов или толстые антивибрационные прокладки, и зазор исчезнет.
Моё правило: если вы не можете определить смещение верхней части корпуса относительно края материнской платы, не стоит предполагать, что толстый верхний радиатор поместится.
Фронтальное крепление: налог на продажу видеокарт.
Обычно фронтальные радиаторы позволяют избежать конфликтов с оперативной памятью, но при этом взимают другую плату: зазор для подключения видеокарты.
Корпус может вмещать 360-мм фронтальный радиатор и 340-мм видеокарту по отдельности. Однако он может не вмещать 340-мм видеокарту после установки 45-мм радиатора и 25-мм вентиляторов. Эта 70-мм конструкция напрямую связана с видеокартой.
Это особенно важно для длинных современных видеокарт. Длина NVIDIA RTX 4090 Founders Edition составляет 304 мм, а у многих партнерских карт эта длина превышает указанное значение. Добавьте к этому замечание NVIDIA о необходимости обеспечения зазора для кабелей в 36 мм, и толщина радиатора, устанавливаемого на передней панели, становится реальной проблемой компоновки, а не просто деталью в таблице.
Боковой монтаж: красиво, но не всегда прощает ошибки.
Боковые радиаторы выглядят аккуратно в двухкамерных корпусах. Они также скрывают проблемы совместимости: угол изгиба трубок, ориентация вентилятора, зазор между стеклом и корпусом, высота помпы и прокладка кабелей.
Толстый боковой радиатор может создать красивую сборку, но с ней ужасно сложно работать. У меня нет терпения к демонстрационным компоновкам, которые требуют снятия радиатора, чтобы добраться до разъема на материнской плате. Это не премиально. Это косплей-инженерия.
Нижнее крепление: обычно плохая идея для системы «все в одном».
Нижние радиаторы могут использоваться в системах жидкостного охлажения, где правильно спланировано расположение насоса и резервуара. Для многих систем жидкостного охлажения установка снизу рискованна, поскольку положение насоса и циркуляция воздуха могут вызывать шум или проблемы с производительностью.
Даже если он подходит по размеру, он может лишить графический процессор необходимого тепла или направить теплый воздух внутрь карты. Толщина нижнего радиатора также уменьшает вертикальный зазор в случаях, когда графический процессор и так расположен близко к основанию.
Да, это может подойти.
Стоит ли? Это уже другой вопрос.
Проблема вентилятора: толщина материала требует давления
Зазор между вентилятором радиатора и корпусом — это не просто физический зазор. Это зазор, влияющий на производительность.
Более толстые радиаторы могут требовать большего статического давления, поскольку вентиляторам приходится проталкивать воздух через большее сопротивление. Плотные ребра, толстые сердечники, пылевые фильтры, ограничивающие поток панели и низкая частота вращения вентиляторов — все это усугубляет проблему. Если вентиляторы не могут прокачивать воздух через радиатор, он превращается в теплый металлический кирпич, созданный для маркетинговых уловок.
Вот почему важны кривые работы вентиляторов. Руководство по оптимизации кривых работы вентиляторов от AceGeek должно быть частью обсуждения радиаторов, потому что кулер не работает в одном фиксированном состоянии. Он реагирует. Плохо настроенные кривые работы вентиляторов приводят к тому, что толстые радиаторы начинают скакать, издавать свистящие звуки и переключаться между температурными состояниями.
Толстый радиатор, работающий на скорости 800 об/мин, может не оправдать ожиданий. Тот же радиатор, работающий на скорости 1500 об/мин, может хорошо охлаждать, но раздражать всех в комнате. Тонкий радиатор с меньшим сопротивлением может обеспечить более стабильный акустический профиль. Именно это вам и не обещают в технических характеристиках.
Тишина препятствует циркуляции воздуха.
А если вам нужен одновременно низкий уровень шума и эффективное отведение тепла, вам необходима большая площадь поверхности, чистый воздухозаборник, разумное давление вентилятора и достаточный зазор, чтобы не задушить систему. Этого не добьешься, втискивая самый толстый радиатор в самый маленький свободный слот.
Как проверить зазор радиатора перед покупкой
Используйте этот способ до оформления заказа, а не после истечения срока возврата.
Шаг 1: Определите реальную толщину радиатора.
Узнайте толщину сердечника радиатора в миллиметрах. Обычные радиаторы AIO имеют толщину около 27 мм, в то время как радиаторы для кастомных систем жидкостного охлажения могут иметь толщину около 30 мм, 38 мм, 45 мм или 60 мм.
Не доверяйте фотографиям. Изображения товаров вводят в заблуждение путем умолчания.
Шаг 2: Увеличьте толщину вентилятора.
Большинство стандартных 120-мм и 140-мм вентиляторов имеют толщину 25 мм. Тонкие вентиляторы могут быть толщиной 15 мм, но при этом часто теряют в давлении или качестве шума. Конструкция «push-pull» удваивает глубину вентилятора.
Прежде чем любоваться фотографиями процесса сборки, произведите необходимые расчеты.
Шаг 3: Добавьте небольшие надбавки
Учитывайте запас по головкам винтов, резиновым прокладкам, изгибам кабелей, выступам фитингов и производственным допускам. Мне нравится иметь как минимум 5-10 мм практического запаса, когда радиатор находится рядом с оперативной памятью, радиаторами VRM, кабелями EPS или стеклом.
Некоторые люди более экономны.
Некоторые люди считают компьютер «готовым к работе», даже если боковая панель выпирает.
Шаг 4: Проверьте положение крепления, сравнив его с реальными компонентами.
Верхняя установка означает установку оперативной памяти, радиаторов материнской платы, кабеля EPS и верхнего смещения.
Фронтальная установка подразумевает длину видеокарты, изгиб кабеля питания видеокарты, прокладку трубки помпы и ограничение потока воздуха через переднюю панель.
Боковое крепление подразумевает глубину камеры, прокладку кабелей, изгиб трубки и направление вращения вентилятора.
Нижнее крепление означает наличие достаточного пространства для вентиляции графического процессора и риск повреждения помпы в месте её расположения.
Шаг 5: Сравните с вашим конкретным случаем.
Не спрашивайте: «Подходит ли этот корпус для 360 мм?»
Просить:
Подойдет ли он по толщине моего радиатора?
Подойдет ли он для вентиляторов такой толщины?
Поддерживает ли он установку стека в этом положении крепления?
Поместится ли он без проблем с радиатором материнской платы?
Сбрасывает ли это высоту моей оперативной памяти?
Остаётся ли место для кабелей EPS и вентилятора?
Могу ли я провести техническое обслуживание системы позже?
Здесь также пригодится руководство AceGeek по выбору кулеров для процессоров Intel Core i9 и Ryzen 9. Мощным процессорам требуется дополнительное пространство для охлаждения, но пространство, физически блокирующее материнскую плату, является фиктивным.
Мои правила определения толщины радиатора.
Вот что я бы сказал строителю прямо, прежде чем он потратит деньги:
Ситуация сборкиБолее безопасный выбор радиатораПочемуКомпактный корпус ATX или M-ATX с верхним радиаторомРадиатор от 27 до 30 ммУменьшает конфликты между ОЗУ, VRM и EPSВысокая ОЗУ с RGB-подсветкой (более 40 мм)Тонкий верхний или передний радиаторРынок быстро увеличивает риск столкновения верхних вентиляторовВидеокарта класса RTX 4090 с передним радиаторомТонкий передний радиатор или более крупный корпусДля длины видеокарты и зазора для кабелей требуется тихое рабочее ПКТонкий/стандартный радиатор с вентиляторами на низких оборотахСтабильность шума важнее толщины радиатораСборка с процессором Core i9 для интенсивного рендерингаСЖО 360 мм или кастомная система жидкостного охлаждения с проверенным зазоромДля работы процессора мощностью 253 Вт требуется реальный запасПотокуКастомная система жидкостного охлаждения малого форм-фактораТонкий радиатор, тщательный выбор вентиляторовТолщина ухудшает компактную компоновкуДвухкамерная сборкаДля демонстрацииБоковой радиатор только после проверки трассировки трубокУдобные компоновки могут быть очень сложными в обслуживании
Моё непопулярное мнение: оптимальная толщина радиатора для большинства обычных высокопроизводительных сборок — это не самый толстый радиатор. Это самый толстый радиатор, который корпус может вместить, убрать и обслуживать без проблем.
Обычно это означает 27–30 мм для систем жидкостного охлажения «все в одном» и многих сборок с верхним расположением вентиляторов, 30–38 мм для сбалансированных систем жидкостного охлажения, и 45 мм и более только в том случае, если корпус, вентиляторы и компоновка были выбраны с учетом этого с самого начала.
Часто задаваемые вопросы
Какова толщина радиатора при сборке ПК?
Толщина радиатора — это глубина радиатора системы жидкостного охлаждения ПК от передней до задней части, обычно измеряемая в миллиметрах. Она влияет на зазоры, необходимое давление вентилятора, сопротивление воздушному потоку, прокладку трубок, а также на то, поместится ли радиаторная система рядом с оперативной памятью, радиаторами материнской платы, кабелями питания видеокарты или панелями корпуса. Это не то же самое, что длина радиатора.
В реальных сборках к толщине вентилятора и небольшим зазорам необходимо добавлять толщину радиатора. 30-миллиметровый радиатор с 25-миллиметровыми вентиляторами уже образует 55-миллиметровую конструкцию без учета винтов, прокладок и изгибов кабелей.
Почему толщина радиатора нарушает совместимость сборок?
Толщина радиатора нарушает совместимость сборок, поскольку в технических характеристиках корпуса часто указывается допустимая длина радиатора, например, 240 мм, 280 мм или 360 мм, но не гарантируется, что вся конструкция радиатора и вентилятора не будет зазорять с оперативной памятью, радиаторами VRM, кабелями EPS, длиной видеокарты, изгибами трубок или пространством на боковой панели. Маркировка неполная.
Наибольшая опасность существует при использовании систем жидкостного охлажения с верхним расположением радиатора и при переднем расположении радиатора с длинными видеокартами. Несколько лишних миллиметров могут превратить сборку из аккуратной в систему с жестким соединением компонентов.
Толстый радиатор лучше тонкого?
Толстый радиатор лучше тонкого только в том случае, если корпус обеспечивает достаточный зазор, вентиляторы имеют достаточное статическое давление, путь воздушного потока не ограничен, а дополнительная тепловая масса или глубина ребер позволяют эффективно использовать нагрузку. Без соблюдения этих условий толщина может привести к увеличению шума и проблемам с установкой без улучшения охлаждения.
Для многих стандартных сборок более разумным выбором будет тонкий или стандартный радиатор с более чистым воздушным потоком. Более крупные компоненты системы охлаждения не исправят неудачную компоновку корпуса.
Как проверить зазор между радиатором и корпусом перед покупкой?
Проверка зазора для радиатора производится путем сложения толщины радиатора, толщины вентилятора, припуска на винты и прокладки, пространства для трубок или фитингов, пространства для изгиба кабелей и запаса для обслуживания, а затем сравнения этой суммы с реальным зазором для крепления в корпусе вблизи материнской платы, оперативной памяти, видеокарты и панелей. Не следует полагаться только на длину радиатора.
Используйте точные размеры вашего корпуса, радиатора, вентиляторов, материнской платы, оперативной памяти и видеокарты. Затем сверьтесь с фотографиями реальных сборок или руководствами для аналогичного места установки.
Имеет ли значение зазор между вентилятором радиатора и радиатором?
Зазор между вентилятором и радиатором имеет значение, поскольку вентиляторам необходимо как физическое пространство, так и свободный поток воздуха для беспрепятственной прокачки через радиатор без препятствий, турбулентности, вибрации или столкновения с расположенными рядом компонентами. Вентилятор, который технически подходит, но при этом упирается в оперативную память, стекло, кабели или ограничивающую панель, может работать плохо и издавать более громкий звук.
Это особенно важно для более толстых радиаторов, плотных рёбер охлаждения, пылевых фильтров и тихих систем, работающих на низких оборотах. Зазоры являются частью эффективности охлаждения.
Для системы жидкостного охлажения AIO размером 360 мм следует использовать толстый или тонкий радиатор?
Для 360-мм системы жидкостного охлажения, устанавливаемой в верхней части стандартного корпуса ATX, обычно следует использовать тонкий или стандартный радиатор, поскольку в этом положении часто приходится конкурировать с высотой оперативной памяти, радиаторами VRM, кабелями EPS и зазором над верхним краем материнской платы. Толстые радиаторы имеют смысл только в том случае, если корпус был спроектирован с учетом дополнительного смещения и глубины.
При фронтальной установке проверьте длину видеокарты после установки радиатора и вентиляторов. Маркировка 360 мм не защитит вас от потери зазора.
В заключение: оцените весь набор инструментов, прежде чем покупать то, что рекламируется.
Именно толщина радиатора является тем местом, где проявляются недальновидные рекомендации по совместимости.
Прежде чем покупать корпус, кулер, радиатор или комплект вентиляторов, запишите фактические параметры: толщину радиатора, толщину вентилятора, высоту оперативной памяти, длину видеокарты, высоту радиатора материнской платы, верхнее смещение, передний зазор, прокладку трубок и пространство для изгиба кабелей. Затем добавьте 5-10 мм запаса на обслуживание, вместо того чтобы делать вид, что ваша сборка будет вечно нетронутой.
Ваш следующий шаг прост: сегодня же проверьте запланированную сборку. Если радиатор находится в нескольких миллиметрах от оперативной памяти, видеокарты, защитного стекла или компонентов материнской платы, измените компоновку прямо сейчас. Выберите более тонкий радиатор, более вместительный корпус, низкопрофильную оперативную память, другое расположение вентиляторов или более удобный путь воздушного потока.
Сначала сделайте скучные вычисления. Так вы избежите дорогостоящих сожалений в будущем.