Wie man einen PC mit hohem Luftdurchsatz baut, ohne zu viel auszugeben
Die Lüge der Abkühlung, die niemand zugeben will
Der Luftstrom wirkt als Hebel.
Ich habe schon erlebt, wie PC-Bauer 180 Dollar für eine Wasserkühlung, 70 Dollar für leuchtende Lüfter und weitere 30 Dollar für Kabelverlängerungen ausgegeben haben – und trotzdem war ihr System heißer als ein schlichtes Gehäuse mit Mesh-Front und drei vernünftigen 120-mm-PWM-Lüftern. Der Grund: Die teure Konfiguration ließ die Grafikkarte zu wenig Luft bekommen, während die günstige sie mit sauberer Ansaugluft versorgte. Warum doppelt zahlen?
Das ist die unangenehme Wahrheit über die PC-Luftzirkulation: Wärme kümmert sich nicht um Ihr RGB-Design. Sie kümmert sich nicht um gehärtetes Glas. Sie kümmert sich nicht darum, ob auf einer Produktseite „Gaming“ steht. Wärme folgt Druck, Widerstand, Abstand, Staub, Lüfterkurven und Wattzahl.
Moderne Hardware verschlimmert das Problem. NVIDIA gibt für die RTX 4090 Founders Edition eine Gesamtleistungsaufnahme von 450 W, Abmessungen von 304 mm Länge, 137 mm Breite und 61 mm Dicke an, empfiehlt eine minimale Systemleistung von 850 W und weist auf der Spezifikationsseite der RTX 4090 auf einen erforderlichen Kabelabstand von 36 mm um den Stromanschluss hin. Das ist keine kleine Karte, die höflich um Luft bittet. Das ist ein Heizkörper mit DisplayPort-Anschluss.
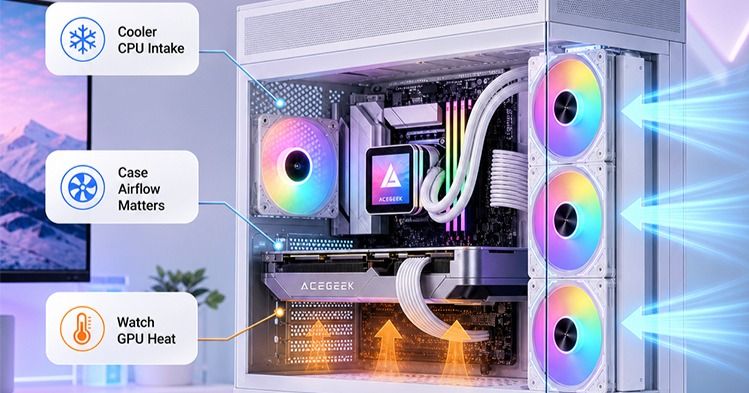
Die Frage lautet also nicht „Wie viele Lüfter kann ich einbauen?“ Die Frage ist viel heikler: Wo bekommt die GPU Frischluft, wo entweicht die warme Luft, und wie viel Geld verschwenden Sie, bevor Sie diese Fragen beantworten?
Beginnen Sie mit dem Gehäuse, nicht mit dem Kühler.
Die beste Verbesserung der PC-Luftzirkulation ist in der Regel kein Premium-Kühler. Es ist das Gehäuse.
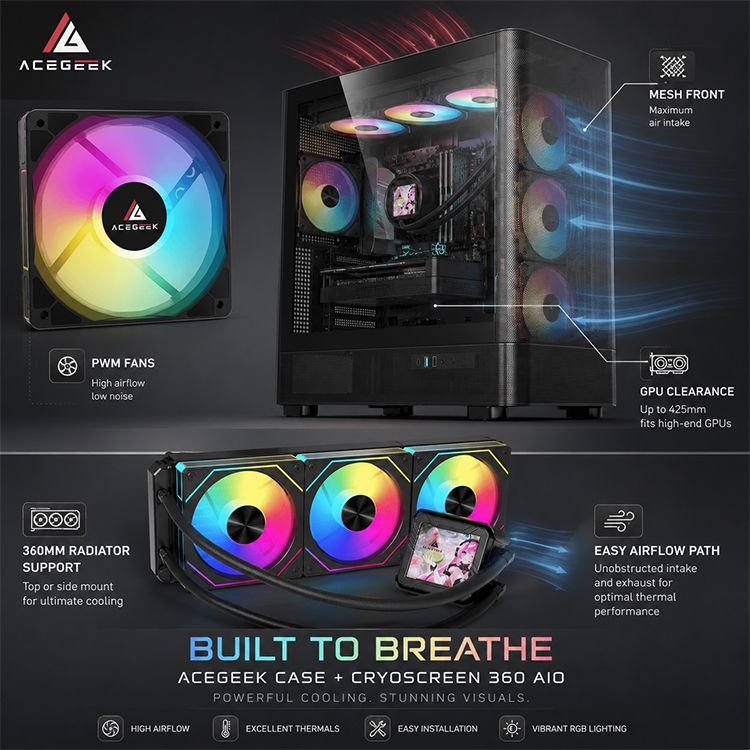
Ein Gehäuse mit guter Belüftung zeichnet sich durch einen Lufteinlass mit geringem Widerstand an Vorder- oder Seite, ausreichend Platz um die Grafikkarte, sinnvolle Abluftwege, herausnehmbare Staubfilter und genügend Platz für die Kabel aus, damit die Rückseite nicht zu einem unübersichtlichen Kabelgewirr wird. Ein Gehäuse mit schlechter Belüftung hingegen hat eine geschlossene Vorderseite, winzige seitliche Schlitze, viel Glas und wird von der Marketingabteilung als „optimiert“ angepriesen.
Ich würde zunächst die Gehäuselayouts der Acegeek- PC-Gehäuse vergleichen und anschließend den Gehäuse-Auswahlleitfaden des Herstellers lesen, bevor ich mich mit dem Lüfterbudget beschäftige. Der Grund ist einfach: Wenn das Gehäuse den Lufteinlass behindert, ist jeder zusätzliche Lüfter nur noch ärgerlicher.
Die Regel für PC-Gehäuse mit Mesh-Front
Ein PC-Gehäuse mit Mesh-Front ist zwar nicht automatisch perfekt, bietet aber Spielraum. Und Spielraum ist wichtig.
Bei eingeschränkter Luftzufuhr drehen die Frontlüfter schneller, der Geräuschpegel steigt, Staub sammelt sich schneller in den engen Lüftungsschlitzen und die Grafikkarte beginnt, wärmere Innenluft umzuwälzen. Bei einem günstigen PC mit guter Belüftung würde ich eher ein schlichtes ATX- oder M-ATX-Gehäuse mit Mesh-Front und drei ordentlichen Lüftern kaufen, als ein luxuriöses Glasgehäuse und dann zu versuchen, es mit sechs lauten Lüftern zu retten.
Die bittere Wahrheit: Ein „leises“ Gehäuse mit geschlossener Frontblende ist oft lauter als ein Gehäuse mit Mesh-Einsatz, da die Lüfter eine höhere Drehzahl benötigen, um die gleiche Luftmenge durch kleinere Öffnungen zu befördern.
Geben Sie Ihr Geld dort aus, wo sich die Luft tatsächlich bewegt.
Hier ist meine pragmatische Ausgabenreihenfolge für einen PC-Build mit hohem Luftdurchsatz:
Upgrade-Entscheidung: Was es wirklich verbessert, Lohnt sich die Investition?, Oft überteuert, Meine Budget-Meinung: Mesh-Front oder offenes Gehäuse: Reduziert den Lufteinlasswiderstand: Ja, besonders bei Gaming-GPUs; Dekorative, glasreiche Fronten: Hier investieren, bevor man Lüfter kauft; 2 Frontlüfter + 1 Hecklüfter: Schafft einen sauberen, grundlegenden Luftstrom: Ja; Jede Montagefläche ist sofort belegt; Beste Ausgangskonfiguration: 140-mm-Lüfter, sofern unterstützt; Mehr Luftstrom bei niedrigeren Drehzahlen: Oft kleine RGB-Lüfter mit 120 mm; Lohnt sich, wenn das Gehäuse sie unterstützt; 4-Pin-PWM-Lüfter: Bessere Lüfterkurvensteuerung: Ja; Teure Controller-Systeme; Zuerst praktische PWM-Lüfter kaufen; 360-mm-AIOC (Airflow-Control): CPU-Wärmeabfuhr: Manchmal; Als Lösung für schlechten Gehäuseluftstrom; Nicht die erste Lösung; Vertikale GPU-Montage: Änderungen an Aussehen und Platzbedarf; Selten für den Luftstrom; „Premium“-Showcase-Builds: Vermeiden, außer getestet; Staubfilter: Sauberere Langzeitkühlung: Ja; Ultradichte Filter, die nie gereinigt werden; Nur gut, wenn sie gewartet werden
Wenn Sie Lüfter auswählen, sollten Sie nicht einfach das schönste Set kaufen. Prüfen Sie, ob es sich um 3-Pin-DC- oder 4-Pin-PWM-Lüfter handelt. Der Acegeek- Leitfaden zu 3-Pin- und 4-Pin-PC-Lüftern ist hier hilfreich, denn die Lüftersteuerung ist nicht nur eine Frage der Optik; sie entscheidet darüber, ob das System unter Last gleichmäßig taktet oder zwischen zu heiß und zu laut schwankt.
Lassen Sie sich aber auch nicht von der CFM-Angabe blenden. CFM-Werte werden üblicherweise unter Idealbedingungen gemessen, nicht hinter einem Staubfilter, nicht an der Frontblende und nicht in einem Gehäuse mit einer 3-Slot-GPU, die Wärme in die zentrale Kammer abgibt. Der statische Druck spielt bei restriktiven Lufteinlässen und Radiatoren eine Rolle. Die geräuschbereinigte Leistung ist wichtiger als eine beeindruckende Zahl auf der Verpackung.
Erstellen Sie eine PC-Lüfterkonfiguration, die nicht gegen sich selbst arbeitet.
Eine vernünftige PC-Lüfterkonfiguration ist langweilig. Genau deshalb funktioniert sie.
Für die meisten preisgünstigen PC-Konfigurationen mit guter Belüftung gefällt mir dieser Ausgangspunkt:
Zwei Ansaugventilatoren an der Vorderseite oder an der Seite.
Ein Heckabluftventilator.
Optionaler Auspuff oben nur dann, wenn sich bei den Temperaturen herausstellt, dass er hilfreich ist.
Das war's.
Wenn PC-Bauer sofort alle Lüfterplätze oben bestücken, wird manchmal Frischluft abgesaugt, bevor sie den CPU-Tower-Kühler erreicht, oder es entsteht ein zu kurzer Luftweg, durch den die Ansaugluft ein- und austritt, ohne die GPU zu umspülen. Mehr Lüfter können eine schlechtere Luftführung bedeuten. Ich habe das oft genug getestet, um der Symmetrie nicht mehr zu trauen.
Positiver Druck ist keine Zauberei, aber er hilft.
Ein leichter Überdruck sorgt für mehr gefilterte Zuluft als Abluft, sodass die Luft eher durch Spalten entweicht, anstatt Staub durch jede Ritze anzusaugen. Bei einem PC-Gehäuse mit Mesh-Front bedeutet dies in der Regel eine höhere Lüfterleistung für die Zuluft als für die Abluft.
Übertreiben Sie es nicht. Zu hoher Überdruck kann bei schwacher Abluft Wärme stauen. Zu hoher Unterdruck kann Staub durch ungefilterte Spalten ziehen. Es geht nicht um Ideologie, sondern um eine geringere GPU-Hotspot-Temperatur, eine niedrigere CPU-Gehäusetemperatur, eine stabile Lüfterdrehzahl und weniger Staub nach drei Monaten.
Der günstige Test, der das Raten überflüssig macht
Führen Sie eine reproduzierbare Lastprüfung über 15 Minuten durch. Verwenden Sie dabei die gleiche Raumtemperatur. Protokollieren Sie, wenn möglich, die CPU-Gehäusetemperatur, die GPU-Temperatur, den GPU-Hotspot, die Lüfterdrehzahl und die Geräuschentwicklung.
Testen Sie dann jeweils eine Änderung:
Frontblende ein/aus
Staubfilter sauber vs. staubig
Top-Fans an vs. aus
Seitenverkleidung an vs. aus
GPU-Halterung installiert vs. entfernt, falls sie den unteren Lufteinlass blockiert.
Frontlüfter mit 900 U/min vs. 1200 U/min
Wenn die GPU-Temperatur durch das Entfernen der Frontblende um 7 °C sinkt, liegt kein Lüfterproblem vor, sondern eine zu geringe Luftzufuhr. Verändert das Entfernen der Seitenblende kaum etwas, ist der Luftstrom im Gehäuse möglicherweise bereits ausreichend, und der Flaschenhals könnte der GPU-Kühler oder die Lüfterkurve sein.
Der Rechenzentrumstrick, den PC-Hersteller sich aneignen sollten
Professionelle Kühlteams legen keinen Wert auf die Anzahl der Lüfter. Sie überwachen die Ansaugtemperatur.
Die Richtlinien des US-Energieministeriums für die Planung von Rechenzentren verweisen auf den von ASHRAE empfohlenen Luftkühlungsbereich von 18 °C bis 27 °C für Umgebungen der Klassen A1–A4. Dasselbe Dokument unterscheidet zwischen empfohlenen und lediglich zulässigen Bedingungen. Diese Unterscheidung ist auch für PCs relevant: „Nicht abstürzen“ ist nicht dasselbe wie „effizient und leise laufen“.
Das Lawrence Berkeley National Laboratory betont ebenfalls, dass die Kühlleistung am Lufteinlass der Geräte beurteilt werden sollte, nicht nur anhand der Ablufttemperatur oder der Raumtemperatur. Im Klartext für PC-Bastler: Achten Sie nicht nur auf die Anzahl der Gehäuselüfter, sondern fragen Sie sich, welche Lufttemperatur Ihre GPU- und CPU-Kühler tatsächlich erreichen.
Deshalb halte ich nichts von pauschalen Ratschlägen wie „mehr Abluft einbauen“. Wenn Ihre Grafikkarte heiße Luft aus einem durch Glas verstopften unteren Gehäuseteil ansaugt, mag ein zusätzlicher Lüfter oben das Gehäuse zwar optisch aufwerten, bringt aber kaum Vorteile für die eigentliche Grafikkarte.
Brauchen Sie ein Warnsignal für die gesamte Branche? Reuters berichtete im Dezember 2024, dass der Strombedarf von US-Rechenzentren bis 2028 6,7 % bis 12 % des gesamten US-Stromverbrauchs erreichen könnte. GPU-intensive KI-Server und der damit verbundene Kühlbedarf tragen maßgeblich zu diesem Anstieg bei. Andere Größenordnung, gleiche Physik: Watt werden zu Wärme, und Wärme muss abgeführt werden.
Wo übermäßige Ausgaben üblicherweise auftreten
Das Muster der übermäßigen Ausgaben ist vorhersehbar.
Zuerst kauft jemand ein schickes Gehäuse mit mangelhafter Belüftung. Dann kauft er zusätzliche Lüfter. Dann eine All-in-One-Wasserkühlung. Dann bessere Wärmeleitpaste. Dann gibt er der CPU die Schuld. Dabei wird die Grafikkarte immer noch nicht ausreichend mit Kühlleistung versorgt, der Radiator bläst die Wärme ins Gehäuse, und die Lüfter klingen wie eine kleine Drohne.
Intels Richtlinien zur Prozessortemperatur besagen, dass die Tjunction max die Temperatur ist, bei der der Prozessor die interne Temperaturregelung aktiviert, um die Leistungsaufnahme zu reduzieren und die Temperatur zu begrenzen. Intel weist darauf hin, dass dieser Grenzwert je nach Produkt üblicherweise zwischen 100 °C und 110 °C liegt. Anders ausgedrückt: Überhitzungsschutz ist keine Leistungsoptimierung.
Eine 240-mm- oder 360-mm-AIO-Wasserkühlung kann hervorragend sein. Ich bin kein Gegner von Wasserkühlung.
Ich bin jedoch gegen Panikkäufe. Wenn Ihr Gehäuse einen Tower-Kühler nicht ausreichend mit Kühlluft versorgen kann, kann es auch zu Problemen mit der Radiatorplatzierung, der Schlauchführung, dem Platz für den Arbeitsspeicher, den Mainboard-Kühlkörpern und der Luftverteilung am Gehäusedeckel kommen. Bevor Sie einen großen Radiator kaufen, sollten Sie den Acegeek -Leitfaden zur Radiatorplatzierung konsultieren und ihn mit den Angaben in der CPU-Kühlerkategorie vergleichen .
Meine Regel: Zuerst die Gehäusebelüftung optimieren, dann entscheiden, ob der CPU-Kühler noch der limitierende Faktor ist.
Die RGB-Lüfterpaket-Falle
Günstige ARGB-Lüftersets können für einen budgetfreundlichen PC mit guter Luftzirkulation ausreichen, vorausgesetzt, sie fördern die Luft gut, lassen sich sauber anschließen und regulieren. Ein Lüfter, der bei 1500 U/min zwar gut aussieht, aber furchtbar klingt, wird letztendlich auf 700 U/min begrenzt, wo er seine Aufgabe möglicherweise nicht mehr erfüllt.
Zuerst auf gute Belüftung achten. Dann auf die Beleuchtung.
Die Falle für kleine Fälle
Kleine Fälle sind nicht schlecht. Schlampige kleine Fälle sind schlecht.
Hochleistungs-Hardware in kompakten Gehäusen erfordert eine sauberere Kabelführung, ein besseres Kabelmanagement und weniger Annahmen. Der Artikel von Acegeek über kleine Gehäuse und Hochleistungs-Hardware bringt es auf den Punkt: Die GPU benötigt als erstes Zugang zu kühler Ansaugluft, und Kabel oder Filter können den einzigen Lufteinlasskanal zu einem Wärmestau machen.
Wenn Sie ein M-ATX- oder ITX-System bauen, ist die Lüfteranordnung wichtiger, nicht weniger wichtig.
Mein Budget-Luftstromplan
Hier ist das Setup, das ich erstellen würde, bevor ich Premium-Geld ausgebe:
Fall
Wählen Sie ein Gehäuse mit Mesh-Front oder offener Lufteinlassöffnung, das genügend Platz für Ihre Grafikkarte, Frontlüfter, Abluftöffnung hinten und Kabelmanagement bietet. Bei ATX-Systemen benötige ich ausreichend Platz für die Grafikkarte und zusätzliche Kabelbiegungen. Bei modernen High-End-Grafikkarten sind die zusätzlichen 36 mm Platz um die Stromkabel herum ein wichtiger Tipp.
Fans
Beginnen Sie mit zwei Frontlüftern für die Luftzufuhr und einem Hecklüfter für die Abluft. Falls das Gehäuse 140-mm-Lüfter an der Vorderseite unterstützt, bevorzuge ich diese in der Regel wegen der geringeren Geräuschentwicklung bei vergleichbarem Luftdurchsatz. Andernfalls reichen drei leistungsstarke 120-mm-PWM-Lüfter für viele Systeme der Mittelklasse aus.
CPU-Kühlung
Verwenden Sie für Mittelklasse-CPUs einen ordentlichen Tower-Kühler. Eine 240-mm- oder 360-mm-AIO-Wasserkühlung ist nur dann sinnvoll, wenn die CPU-Leistung, das Gehäuselayout und der Platz für den Radiator dies rechtfertigen. Verwenden Sie Wasserkühlung nicht, um eine unzureichende Luftzufuhr zu kaschieren.
GPU Air
Halten Sie den Lufteinlassbereich der GPU frei. Vermeiden Sie es, dicke Kabelbündel, Blenden, vertikale Halterungen oder Stützstreben dort zu platzieren, wo die GPU-Lüfter Luft benötigen. Falls Sie eine Stützstrebe verwenden müssen, überprüfen Sie die Passform sorgfältig. Acegeeks Anleitung zur Vermeidung von GPU-Durchhangsstützen ist hierbei hilfreich, da eine falsch positionierte Stützstrebe zwar das Durchhängen beheben kann, aber gleichzeitig den Luftstrom blockiert.
Kabelführung
Kabelmanagement ist nicht nur eine Frage der Optik. Ein großer Kabelknoten vor den Lüftern verursacht Turbulenzen und behindert die Luftzirkulation. Verlegen Sie die Kabel der Frontblende flach. Verwenden Sie Klettband. Blockieren Sie nicht den unteren Lufteinlass an der Vorderseite, nur weil Sie die Rückwand schneller schließen möchten.
Staub
Reinigen Sie die Filter alle 1–3 Monate, wenn Sie Haustiere haben, Teppichboden oder einen staubigen Raum. In saubereren Räumen reicht eine Reinigung alle 3–6 Monate. Ein verstopfter Filter ist wie eine Wand im Kostüm.
Das US-Energieministerium weist darauf hin, dass PCs Wärme erzeugen und dass Computer mit dem ENERGY STAR-Label je nach Nutzung 30 bis 65 % weniger Energie verbrauchen als Computer ohne dieses Label. Dies ist ein wichtiger Hinweis für PC-Bauer: Weniger Energieverschwendung bedeutet in der Regel auch weniger Abwärme.
Eine praktische Checkliste für den Hausbau, bevor Sie etwas kaufen
Bitte vor dem Bezahlen verwenden:
Frage: Warum ist das wichtig? Bestehensbedingung: Verfügt das Gehäuse über einen ausreichenden Lufteinlass? Einschränkungen erhöhen die Lüfterdrehzahl und die Wärmeentwicklung. Mesh-Gitter, Lüftungsschlitze oder seitlicher Lufteinlass mit nutzbarer Fläche. Passt die GPU mit ausreichend Kabelfreiheit? Gebogene Stromkabel und blockierte Seitenwände bergen Risiken. GPU-Länge + Platz für Stromanschluss bestätigt. Kann die GPU direkt vom vorderen Lufteinlass mit Luft versorgt werden? Die GPU ist oft die größte Wärmequelle. Keine größeren Kabelverschränkungen oder Halterungen. Sind die Lüfter PWM- oder DC-gesteuert? Lüfterkurven bestimmen Geräuschentwicklung und Ansprechverhalten. 4-Pin-PWM wird für leistungsstarke Systeme bevorzugt. Fördert die Abluft nach oben die Luftzufuhr oder behindert sie diese? Zu viele Lüfter können den Luftstrom kurzschließen. Geprüft anhand der Temperaturen, nicht angenommen. Sind die Filter leicht zu entfernen? Wartung hält den Luftstrom stabil. Werkzeuglose oder schnelle Filterreinigung. Ist der Radiator ausreichend frei? RAM, Schläuche, EPS-Kabel und Kühlkörper kollidieren. Gemessen, nicht geschätzt.
Wenn Sie das tun, vermeiden Sie die klassische Geldverschwendung: Man kauft einen Premium-Kühler, um ein schlechtes Gehäuse auszugleichen, dann kauft man weitere Lüfter, um den Premium-Kühler zu kompensieren, und dann akzeptiert man einen lauteren PC, weil das Budget bereits aufgebraucht ist.
Häufig gestellte Fragen
Was ist ein High-Airflow-PC?
Ein PC mit hohem Luftdurchsatz ist so konstruiert, dass kühle Luft direkt zu den wärmeerzeugenden Komponenten – hauptsächlich Grafikkarte, CPU-Kühler, VRM des Mainboards und SSDs – geleitet wird, während gleichzeitig die warme Luft abgeführt wird, ohne dass die Lüfter durch blockierte Gehäuseteile, verhedderte Kabel oder überlastete Staubfilter beeinträchtigt werden. In der Praxis bedeutet dies ein Gehäuse mit geringem Luftwiderstand, eine sinnvolle Lüfterplatzierung, eine saubere Kabelführung und Temperaturtests unter realer Last.
Wie viele Lüfter benötige ich für eine gute PC-Luftzirkulation?
Die meisten Gaming-PCs benötigen drei gut platzierte Lüfter für eine optimale Luftzirkulation: zwei gefilterte Ansauglüfter an der Vorder- oder Seite und einen Abluftlüfter an der Rückseite. Ein zusätzlicher Abluftlüfter an der Oberseite wird nur dann benötigt, wenn Tests niedrigere CPU- oder GPU-Temperaturen ohne Erhöhung der Geräuschentwicklung zeigen. Mehr Lüfter können hilfreich sein, jedoch nur, wenn sie den Luftstrom unterstützen und nicht behindern.
Ist ein PC-Gehäuse mit Mesh-Front besser als ein Gehäuse mit Glasfront?
Ein PC-Gehäuse mit Mesh-Front bietet in der Regel eine bessere Luftzirkulation, da die Lüfter so einen geringeren Luftwiderstand haben und kühle Raumluft leichter zum GPU- und CPU-Kühler befördern können. Viele Gehäuse mit Glasfront hingegen sind auf schmale Seitenlüftungsschlitze angewiesen, die den Luftstrom behindern und die Lüftergeräusche verstärken. Glas kann zwar auch funktionieren, erfordert aber ein intelligenteres Design für die seitliche oder untere Lufteinlassöffnung.
Sollte ich für einen budgetfreundlichen PC mit guter Luftzirkulation eine AIO-Wasserkühlung kaufen?
Eine AIO-Wasserkühlung lohnt sich bei einem günstigen PC mit guter Luftzirkulation nur dann, wenn die Wärmeentwicklung der CPU, der Platzbedarf des Radiators, die Lüfterposition und der Abluftweg im Gehäuse den Aufpreis gegenüber einem guten Luftkühler rechtfertigen. Bei vielen Systemen der Mittelklasse ist es sinnvoller, die Gehäuselüftung zu verbessern und einen leistungsstarken Tower-Kühler zu verwenden, als direkt auf eine Wasserkühlung umzusteigen.
Wie kann ich die Luftzirkulation in meinem PC verbessern, ohne Geld auszugeben?
Sie können den Luftstrom in Ihrem PC verbessern, ohne Geld auszugeben, indem Sie Staubfilter reinigen, Lufteinlassblockaden beseitigen, Kabel neu verlegen, die Lüfterrichtung überprüfen, Lüfterkurven anpassen und kontrollieren, ob die oberen Abluftlüfter die Luftzirkulation fördern oder ihr die Frischluftzufuhr zu den heißen Komponenten behindern. Die günstigste Methode zur Verbesserung des Luftstroms ist oft die Messung, da sie Fehlkäufe verhindert.
Schlussbetrachtung: Bauen Sie einen kühleren Motor, bevor Sie einen lauteren kaufen.
Beginnen Sie nicht mit einem Einkaufswagen. Beginnen Sie mit dem Wärmepfad.
Erstellen Sie eine Übersicht über Lufteinlass, GPU-Abstand, CPU-Kühlerverlauf, Abluftweg, Staubfilter und Kabelbündel. Testen Sie anschließend jede Änderung einzeln bei realen Temperaturen. Kaufen Sie danach nur das, was die Daten als notwendig erachten: vielleicht ein besseres Gehäuse mit Mesh-Front, vielleicht zwei PWM-Lüfter, vielleicht eine übersichtlichere Radiatoranordnung, vielleicht aber auch gar nichts.
Ihr nächster Schritt ist einfach: Öffnen Sie Ihr aktuelles Gehäuse, machen Sie ein Foto des vorderen Lufteinlasses und ein Foto des GPU-Bereichs und vergleichen Sie dann den Aufbau mit dieser Checkliste, bevor Sie einen weiteren Dollar für Kühlung ausgeben.